Kategória: Training

  • Shoot and Move Drill

    Shoot and Move Drill

    This drill has evolved over the years.

    Originally, it was used partly as a shooting drill and partly as a conditioning exercise.

    Over time, it developed into a flexible offensive drill that can combine:

    • shooting,
    • passing,
    • catching on the move,
    • footwork,
    • ball handling,
    • finishing,
    • screening actions,
    • and conditioning.

    Basic Organization

    Every player works with a partner.

    The players begin near the basket with one basketball.

    The sequence is simple:

    1. One player shoots.
    2. The shooter gets the rebound.
    3. The rebounder passes to the moving partner.
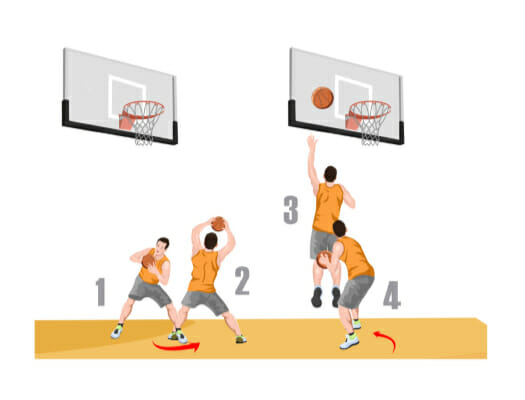
    4. The moving player receives the ball while turning toward the basket.
    5. The drill continues with the players alternating roles.

    An important detail is that the receiver should catch the ball cleanly and legally without traveling.

    The coach can then determine what action must follow the catch.

    Possible Catch-and-Finish Variations

    The receiving player can perform different actions.

    For example:

    • catch and shoot,
    • catch, shot fake and shoot,
    • catch, shot fake, dribble and shoot,
    • catch, shot fake, one dribble, second shot fake and shoot,
    • catch, shot fake and finish with a layup,
    • catch, shot fake, dribble, stop, shot fake and shoot.

    The structure remains the same.

    Only the offensive decision changes.

    Make It Competitive

    The drill can also become a competitive exercise.

    Players can compete by:

    • made baskets,
    • shooting percentage,
    • consecutive makes,
    • time,
    • or completing a required number of successful repetitions.

    This adds pressure and increases the intensity of the drill.

    Connect It to Your Offense

    One of the greatest advantages of the Shoot and Move Drill is its flexibility.

    The movements can be adapted to parts of your own offensive system.

    The coach can use actions that will appear in the next game or actions that are important within the team’s offensive philosophy.

    Instead of practicing movements in isolation, players can rehearse situations they are expected to recognize during competition.

    Adjust the Drill by Position

    Players can perform different actions depending on their position.

    Interior players should generally work within approximately five meters of the basket when practicing post-oriented movements.

    Always keep enough players around the baskets to maintain rebounding and passing flow.

    The coach can also determine the type of pass used:

    • chest pass,
    • bounce pass,
    • two-handed pass,
    • pass off the dribble,
    • or another game-specific pass.

    Every action should be practiced from both sides of the floor.

    Offensive Variations

    The following are examples of movements that can be incorporated into the drill.

    1. Cross-Lane Drive, Spin and Finish

    Dribble across the paint.

    Execute a spin move.

    Finish with a layup.

    2. Baseline Drive, Spin and Finish

    Attack toward the baseline.

    Use a spin move to create separation.

    Finish at the basket.

    3. Ball Screen, Dribble and Shot

    Use a ball screen.

    Come off the screen with the dribble.

    Finish with a shot.

    4. Screen and Roll

    Set the screen and roll toward the basket.

    Practice the timing between the ball handler and screener.

    5. Pick-and-Roll Pass to the Screener

    Use the screen.

    Read the defense.

    Pass to the rolling screener.

    6. Post Movement with a Partner

    Work on post positioning and movement.

    Deliver the entry pass to the interior player.

    7. Post Pass, Cut, Return Pass and Shot

    Pass the ball into the post.

    Cut away from the original position.

    Receive the return pass.

    Finish with a shot.

    8. Screen, Pop and Shoot

    Set the screen.

    Instead of rolling toward the basket, move outward into open space.

    Receive the pass and shoot.

    9. Three-Point Shot

    Move into three-point range.

    Catch in balance and shoot.

    10. 1-on-1 with a Maximum of Two Dribbles

    Play live 1-on-1.

    The offensive player may use no more than two dribbles.

    This forces efficient decision-making.

    11. Dribble, Pivot and Shoot

    Attack with the dribble.

    Come to a controlled stop.

    Use a reverse pivot to create space.

    Finish with a shot.

    12. Backdoor Cut and Bounce Pass

    The offensive player makes a backdoor cut.

    The passer first uses a pass fake high.

    Then deliver a bounce pass toward the basket.

    Add Your Own Actions

    These are only examples.

    The drill can be modified almost endlessly.

    You can incorporate:

    • flare screens,
    • curls,
    • handoffs,
    • pin-downs,
    • post-ups,
    • pick-and-roll reads,
    • closeout attacks,
    • relocation threes,
    • cuts,
    • or actions taken directly from your team’s offense.

    The coach’s imagination is the main limitation.

    Why the Drill Works

    The value of the Shoot and Move Drill is that players rarely stand still.

    They must continuously:

    • move,
    • catch,
    • turn,
    • make decisions,
    • execute footwork,
    • pass,
    • rebound,
    • and finish.

    That makes the drill more game-like than stationary shooting alone.

    It can also be used to combine technical development with conditioning.

    From Technique to Game Action

    Shooting practice becomes more valuable when the shot is connected to the movement that creates it.

    Instead of simply asking players to make repetitions, teach them to arrive at the shot through realistic basketball actions.

    Move.

    Receive.

    Read.

    Attack.

    Finish.

    Then move again.
  • 100 Off-Season Tasks for Basketball Players

    100 Off-Season Tasks for Basketball Players

    An Off-Season Basketball Development Program

    The off-season provides an opportunity to improve skills, physical preparation, basketball habits and confidence.

    The following list comes from an earlier Basket Clinic training program and presents 100 ideas for individual off-season development.

    Important: This is an archival training resource. Some of the original training volumes and methods reflect an earlier approach to athletic preparation and should not automatically be treated as modern prescriptions. Training load should always be adjusted to the player’s age, development, health, experience and individual needs.

    At Home

    1. Perform 25 fingertip push-ups.
    2. Perform 500 calf raises.
    3. Take 100 simulated shots while lying on your back, concentrating on the shooting motion.
    4. Perform isometric exercises using a doorframe, with an emphasis on leg work.
    5. Read basketball and motivational books and develop a positive mental attitude.
    6. Squeeze two tennis balls to work on hand strength.
    7. Hold and handle a basketball while watching television.
    8. Sleep with your basketball.

    Outdoor Tasks

    1. Jog 3–7 kilometers daily.
    2. Practice dribbling a golf ball or tennis ball.
    3. Jump rope for 10 minutes every day.
    4. Practice spinning the basketball on your fingers.
    5. Work on gripping and controlling the basketball in your hands.
    6. Practice juggling three balls.
    7. Run 10 × 30-meter sprints.
    8. Play in adidas Streetball events.

    In the Gym

    1. Warm up properly and perform mobility and stretching exercises.
    2. Play plenty of 1-on-1.
    3. Play plenty of 2-on-2.
    4. Play plenty of 3-on-3.
    5. Play plenty of 4-on-4.
    6. Play plenty of 5-on-5.
    7. Handle the ball between and around your legs without looking down.
    8. Dribble two basketballs simultaneously.
    9. Slalom-dribble between chairs.
    10. Practice dribbling while sitting on a chair.
    11. Practice the behind-the-back dribble.
    12. Sprint-dribble the full length of the court.
    13. Practice changing speed while dribbling with both hands.
    14. Perform a spin move at each court line.
    15. Practice between-the-legs changes of hand.
    16. Touch the net, backboard or rim continuously 25 times, depending on your jumping ability.
    17. Perform 25 jumps over a bench or similar obstacle.
    18. Practice dribbling with your eyes closed.
    19. Dribble while moving in a circle with the opposite hand touching the floor.
    20. Dribble around the three circles of the basketball court.

    Shooting and Finishing

    1. Shoot from approximately 30 centimeters from the basket and carefully check your technique — elbow position, wrist action and follow-through.
    2. Make 10 layups from each side.
    3. Practice 10 post moves from each side.
    4. Practice stationary hook shots for 5 minutes.
    5. Practice hook shots with both hands for 10 minutes.
    6. Take 50 mid-range shots from inside.
    7. Shoot 100 free throws.
    8. Take 20 bank shots from each side.
    9. Take 100 set or rhythm shots from approximately five meters without using a dribble.
    10. Take 100 jump shots from approximately five meters.
    11. Practice attacking and penetration moves 100 times.
    12. Take 100 jump shots from approximately 7.5 meters.
    13. If you are physically capable, practice 10 dunks with each hand.

    Ball Control

    1. Move the basketball around each leg.
    2. Move the basketball around both legs together.
    3. Move the basketball around your head.
    4. Move the basketball around your waist.

    Strength Development

    1. Perform leg presses for 10 repetitions, three times per week.
    2. Perform leg extensions for 10 repetitions, three times per week.
    3. Perform leg curls for 10 repetitions, three times per week.
    4. Perform bench presses for 10 repetitions, three times per week.

    Defensive Footwork and Movement

    1. Practice defensive slides to the right and left.
    2. Practice defensive movement forward.
    3. Practice defensive movement backward.
    4. Practice defensive footwork with changes of stance.
    5. Practice the jump stop out of the dribble.
    6. Practice pivoting on both feet.
    7. Run backward.
    8. Perform backward hops.
    9. Hop the full length of the court.
    10. Practice hopping with crossing footwork.
    11. Perform sprint drills with line touches.

    Tip-In and Finishing Work

    1. Perform 10 right-handed tip-ins.
    2. Perform 10 left-handed tip-ins.
    3. Perform 10 alternating-hand tip-ins.
    4. Perform 10 two-handed tip-ins.
    5. Perform 10 running tip-ins above the rim, jumping toward the basket — a “Superman” style drill.

    Passing

    1. Practice passing with a medicine ball.
    2. Perform 25 two-handed chest passes.
    3. Perform 25 bounce passes.
    4. Perform 25 hook passes.
    5. Perform 25 overhead passes.
    6. Perform 25 baseball passes.
    7. Perform 25 behind-the-back passes.
    8. Practice any other passing techniques you already know.

    Advanced Footwork and Ball Handling

    1. Practice dribbling with changes of rhythm and hesitation steps.
    2. Practice dribbling while using forward and backward pivots.
    3. Practice dribbling with crossover footwork.
    4. Perform 25 jumps while raising a medicine ball overhead.

    Play the Game

    1. Take part in summer competitions.
    2. Play plenty of games during the summer.
    3. Play against older and more experienced players.

    Take Care of Yourself

    1. Pay attention to good eating, recovery and sleeping habits.
    2. Adjust nutrition and body composition only according to your actual physical needs and appropriate professional guidance.
    3. Avoid alcohol, recreational drugs and smoking.
    4. If appropriate and safe, include selected running or movement activities on grass or sand.
    5. Use the jump rope regularly.
    6. The original program recommends training with ankle weights; this should be regarded as a historical recommendation rather than a universal modern training method.
    7. Play basketball in appropriate basketball shoes.
    8. The original program also recommends weighted-vest training. External loading should only be used when appropriate for the athlete and the exercise.

    Live Basketball During the Summer

    1. Spend as much productive time in the gym as possible during the summer.

    The original program described this as:

    “Live in the gym.”

    The message is commitment — not simply being physically present, but using the off-season deliberately.

    1. Play tennis to challenge hand-eye coordination and movement skills.
    2. Have shooting competitions with your parents, family members or friends.

    Play games such as 33 or other competitive shooting games.

    Give them a head start if necessary.

    1. Accumulate substantial quality basketball practice during the summer.

    The original program set an ambitious target of:

    250 hours of basketball during the off-season.

    The Bigger Idea

    The most valuable lesson in this list is not that every player should complete every task exactly as written.

    The message is that the off-season should be used intentionally.

    Develop:

    • your ball handling,
    • shooting,
    • finishing,
    • passing,
    • footwork,
    • physical preparation,
    • basketball understanding,
    • competitive experience,
    • recovery habits,
    • and confidence.

    Some days may focus on skill.

    Other days may focus on strength, movement or competition.

    The specific program should change according to the player.

    The commitment to improvement should remain.

    The season shows what kind of player you are.

    The off-season gives you the opportunity to change what kind of player you will become.

  • Strengthening After Knee Injury or Surgery

    Strengthening After Knee Injury or Surgery

    How can we gradually strengthen the leg after a knee injury or knee surgery?

    The following exercises come from an earlier Basket Clinic rehabilitation program and focus primarily on:

    • controlled knee loading,
    • balance,
    • single-leg stability,
    • lower-limb strength,
    • coordination,
    • and gradual restoration of movement.

    Important: Rehabilitation after a knee injury or surgery must be individualized. The appropriate exercises and timing depend on the exact injury, surgical procedure and stage of recovery. These exercises should therefore be considered an archival training resource rather than a substitute for guidance from a doctor or physiotherapist.

    Knee Exercises

    1. Forward Lunge Position with Controlled Hold

    Step forward into a lunge position with the recovering leg.

    Keep the other leg controlled and gradually transfer the work toward the recovering side.

    Hold the position for approximately 4–5 seconds, then return to the starting position.

    The movement should remain controlled throughout.

    2. Heel Raise in a Lunge Position

    Take a lunge stance with the recovering leg in front and the other leg behind.

    Raise the heel of the front foot.

    Hold for approximately 4–5 seconds, then slowly lower it.

    3. Small Steps Forward

    Begin in a lunge position with the recovering leg in front.

    Using small steps, bring the other foot toward the recovering leg while keeping both knees flexed.

    Then return gradually to the original position.

    4. Small Cross-Steps Behind

    Maintain the same starting position.

    Use the other leg to make small crossing steps behind the recovering leg.

    Return gradually to the starting position.

    5. Step Together and Back

    Start with the recovering leg in front.

    Bring the other foot forward beside it while keeping both knees flexed.

    Then step back into the original position.

    6. Cross-Step Behind

    From the same lunge position, step the non-injured leg behind the recovering leg.

    Return to the starting position.

    The emphasis is on balance and controlled movement.

    7. Single-Leg Balance

    Begin with the recovering leg in front.

    Lift the opposite leg from the floor while maintaining the recovering knee in a flexed position.

    Hold the balance before returning the foot to the ground.

    8. Single-Leg Balance with Knee Extension

    Lift the opposite leg while gradually extending the recovering knee.

    Return slowly and under control.

    9. Single-Leg Flexion and Extension

    Lift the opposite foot from the floor.

    Balance on the recovering leg.

    From this position:

    • extend the recovering knee,
    • flex it again,
    • then place the opposite leg back on the floor.

    10. Trunk Rotation in a Lunge Position

    Hold a stable lunge position with the recovering leg forward.

    Place both hands behind the head.

    Slowly rotate the trunk:

    • to the right,
    • then to the left.

    The lower body should remain controlled.

    11. Small Knee Pulses

    Maintain the lunge position.

    Perform small, controlled up-and-down movements through the recovering knee.

    Avoid uncontrolled bouncing.

    Wide-Stance Exercises

    The next group of exercises begins from a wide stance.

    Both feet are turned slightly outward.

    The knees should track in the same direction as the toes and remain appropriately aligned with the ankles.

    12. Wide-Stance Squat

    Stand with the feet wide apart.

    Bend both knees into a controlled squat, then return upward.

    Maintain knee alignment throughout the movement.

    13. Alternating Side Loading

    From the wide stance:

    • bend the recovering knee while keeping the opposite leg straighter,
    • return to the middle,
    • then repeat toward the other side.

    The goal is to progressively transfer body weight from one side to the other.

    14. Heel Raises and Knee Bends

    Remain in the wide stance with both knees flexed.

    Perform:

    • two heel raises,
    • two slow knee-bending movements,
    • then repeat the heel raises.

    Maintain the same controlled lower-body position throughout.

    15. Step Together from a Wide Stance

    From the wide, flexed-knee position:

    • bring the right foot toward the left,
    • keep both knees flexed,
    • return to the wide stance.

    Repeat on the opposite side.

    16. Step Together with a Squat

    Bring one foot toward the other while maintaining knee flexion.

    Perform a controlled squat.

    Rise without completely locking the knees, then step back into the wide stance.

    Repeat on both sides.

    17. Single-Leg Hold to the Front

    From the wide stance, transfer the weight onto one leg.

    Lift the opposite leg and hold it slightly forward for approximately 4–5 seconds.

    Return to the wide stance.

    Repeat on the other side.

    18. Single-Leg Hold Behind

    Again transfer the weight to one leg.

    Lift the opposite leg and hold it slightly behind and across the body for approximately 4–5 seconds.

    Return to the starting position.

    Repeat on both sides.

    19. Toe-Raise Walk-In

    Begin in the wide stance with the knees flexed.

    Rise onto the toes.

    Using small steps:

    • bring the feet toward each other,
    • maintain knee flexion,
    • lower the heels in the middle,
    • rise onto the toes again,
    • and step back into the wide stance.

    Then lower both heels.

    20. Heel Raises, Step-In and Squat

    From the wide stance:

    1. perform two heel raises,
    2. use small steps to bring the feet together,
    3. perform a controlled squat,
    4. rise again without fully locking the knees,
    5. step back into the wide stance.

    21. Alternating Side Heel Raises

    From the wide stance:

    • extend the left knee while keeping the right knee flexed,
    • perform two heel raises on the right side,
    • return to the central position with both knees flexed,
    • perform two heel raises,
    • then repeat the sequence on the opposite side.

    Quality Before Quantity

    After a knee injury or surgery, the objective is not simply to complete as many repetitions as possible.

    Movement quality matters.

    The athlete should pay attention to:

    • balance,
    • knee alignment,
    • controlled flexion and extension,
    • stability,
    • gradual weight transfer,
    • and symmetrical movement whenever appropriate.

    Progression should be gradual.

    Basketball eventually demands much more than basic strength.

    The player must ultimately regain the ability to:

    • run,
    • stop,
    • change direction,
    • jump,
    • land,
    • defend,
    • and tolerate repeated basketball-specific loading.

    These exercises represent only one stage of that process.

    The goal is not simply to make the knee stronger.

    The goal is to rebuild the movement capacity required for a safe return to basketball.

  • Ice Age in Practice: Managing Sports Injuries

    Ice Age in Practice: Managing Sports Injuries

    This article looks at the basic principles behind sports injuries, the healing process and the traditional use of rest, ice, compression and elevation.

    Important: This is an archival educational resource. Sports injuries vary greatly in type and severity, and significant or persistent injuries should be assessed by an appropriately qualified healthcare professional.

    Types of Injury

    Sports injuries can broadly be divided into two groups.

    Injuries Caused by Internal Forces

    These may result from sudden or repeated forces generated within the body.

    Examples include:

    • muscle strains,
    • muscle tears,
    • overuse injuries,
    • stress-related injuries,
    • and changes caused by repeated loading.

    Some develop suddenly.

    Others appear gradually as repeated stress exceeds the ability of the tissue to recover.

    External or Traumatic Injuries

    These occur when the body is exposed to an external force.

    Examples include:

    • collisions,
    • falls,
    • direct blows,
    • bruises,
    • fractures,
    • and dislocations.

    External stresses can also contribute to smaller repetitive problems such as blisters.

    What Happens After a Soft-Tissue Injury?

    When soft tissue is injured, some of the affected tissue and small blood vessels may also be damaged.

    The amount of bleeding and swelling depends on:

    • the type of tissue involved,
    • the severity of the injury,
    • and the circulation within the injured area.

    The body then begins a complex healing response.

    The Stages of Healing

    It is impossible to predict an exact recovery time for every injury.

    Recovery is influenced by factors such as:

    • severity,
    • age,
    • tissue involved,
    • general physical condition,
    • rehabilitation,
    • and the way the injury is managed.

    The original framework divides healing into three overlapping phases.

    1. Acute or Inflammatory Phase

    This begins immediately after injury and continues for the first several days.

    2. Repair Phase

    This begins relatively early after injury and may continue for several weeks.

    3. Remodeling Phase

    This develops later in the recovery process and may continue for many months.

    These phases are not completely separate.

    They overlap as the body moves from the initial response toward repair and eventually toward stronger, more functional tissue.

    The Acute Phase

    The first stage begins immediately following injury.

    Typical signs may include:

    • pain,
    • warmth,
    • redness,
    • swelling,
    • and loss of normal function.

    Bleeding into damaged tissues may contribute to swelling and sometimes visible discoloration.

    The body responds rapidly to the injury.

    Blood vessels, inflammatory cells and damaged tissues all participate in the early healing process.

    Inflammation is therefore not simply an unwanted event.

    It is part of the body’s response to tissue damage.

    During this period, however, the injured area may be vulnerable to further stress.

    Early Tissue Repair

    As the healing response progresses, an early structural framework begins to form across the damaged tissue.

    Initially this new material is relatively weak.

    This is one reason why excessive stress immediately after an injury may interfere with recovery.

    Muscle spasm can also occur as part of the body’s protective response.

    Although this may restrict movement around the injured area, it can also contribute to discomfort.

    The early management of an injury therefore aims to protect the damaged area and avoid unnecessary additional trauma.

    Traditional Management During the Acute Phase

    The original article uses the classic principles of:

    • Rest
    • Ice
    • Compression
    • Elevation

    These principles have traditionally been used to help manage pain and swelling following acute soft-tissue injury.

    Rest

    Immediately after an injury, stop the activity that caused or aggravated the problem.

    The injured area should be protected from further unnecessary stress.

    Rest, however, does not necessarily mean complete inactivity for the entire body.

    Depending on the injury and professional advice, an athlete may sometimes continue appropriate training for unaffected parts of the body.

    The objective is to protect the injury without losing all physical conditioning unnecessarily.

    Ice

    Cold treatment has traditionally been used after acute injuries, particularly to help manage pain.

    If ice is used:

    • do not place it directly against the skin,
    • wrap the cold pack in a suitable cloth,
    • avoid excessive exposure,
    • and stop if the skin reacts abnormally or the treatment becomes painful.

    Reduced pain after cooling should not be interpreted as proof that the athlete is ready to return immediately to activity.

    Pain relief and tissue recovery are not the same thing.

    When Extra Caution Is Needed with Ice

    Cold treatment should be used carefully.

    Particular caution is appropriate when:

    • sensation in the area is reduced,
    • circulation is impaired,
    • the athlete has an unusual reaction to cold,
    • or there is uncertainty about the nature of the injury.

    When in doubt, seek professional medical advice.

    Compression

    A supportive compression bandage has traditionally been used to help control swelling.

    Compression should be firm but never so tight that it interferes with circulation.

    If the athlete experiences:

    • numbness,
    • tingling,
    • unusual discoloration,
    • increasing pain,
    • or loss of sensation,

    the bandage should be reassessed immediately.

    Elevation

    Elevating an injured limb may also help manage swelling.

    The injured area should be comfortably supported rather than placed in a position that creates additional pain or tension.

    First Aid Matters

    Early decisions after an injury may influence the recovery process.

    The first priority is always safety.

    If the athlete remains in danger, move them away from that danger when it is safe to do so.

    More serious injuries require appropriate medical assessment.

    Coaches should understand the limits of their own role.

    The job of the coach is not to diagnose every injury.

    The job is to recognize when a player needs professional care.

    The Repair Phase

    As the initial inflammatory response settles, the body begins repairing the damaged tissue.

    New connective tissue develops and gradually becomes stronger.

    However, newly repaired tissue does not immediately possess the same strength or function as healthy tissue.

    For this reason, rehabilitation must progress gradually.

    Too little loading may fail to prepare the tissue for sport.

    Too much loading too early may aggravate the injury.

    The challenge is finding the appropriate progression.

    Returning to Movement

    During the repair phase, carefully selected movement can gradually become part of rehabilitation.

    The objective is eventually to restore:

    • range of motion,
    • strength,
    • coordination,
    • flexibility,
    • and sport-specific function.

    Progression should be controlled.

    Pain or significant worsening of symptoms should not simply be ignored.

    The athlete must gradually earn the ability to perform increasingly demanding tasks.

    Returning to Basketball

    Feeling better is not the same as being ready to compete.

    Basketball requires much more than pain-free walking.

    A returning player may need to tolerate:

    • running,
    • acceleration,
    • deceleration,
    • jumping,
    • landing,
    • cutting,
    • contact,
    • defensive movement,
    • repeated high-intensity efforts,
    • and basketball-specific decision-making.

    The final objective is therefore not simply the disappearance of pain.

    It is the restoration of the physical and functional ability required to play basketball safely and effectively.

    The Coach’s Responsibility

    Coaches should understand basic injury-management principles.

    But they should also understand when responsibility must pass to medical and rehabilitation professionals.

    A player should not return simply because:

    • an important game is approaching,
    • the team needs them,
    • the pain temporarily disappears,
    • or the athlete insists that everything is fine.

    The long-term health of the player must remain more important than one practice or one game.

    Ice, compression and elevation may be tools.

    But the most important tool is good judgment.

  • How Can You Make It Through the Entire Season?

    How Can You Make It Through the Entire Season?

    Warm Up — and Take Recovery Seriously

    Training for around two hours every day is serious physical work.

    Basketball places repeated stress on:

    • muscles,
    • tendons,
    • joints,
    • and the nervous system.

    Simply showing up for practice is not enough.

    A player must also prepare properly for the work.

    If you take training seriously, then you should take preparation and recovery seriously as well.

    Prepare Your Body for Practice

    A gradual warm-up helps prepare the body for higher-intensity basketball activity.

    The objective is to move progressively from low-intensity movement toward the speed and intensity required during practice or competition.

    A good warm-up can help prepare:

    • the muscles,
    • the nervous system,
    • coordination,
    • movement quality,
    • and concentration.

    Instead of beginning practice at full intensity immediately, give the body time to become ready for the demands that follow.

    Mobility and Stretching

    Mobility and stretching can also form part of an athlete’s preparation.

    They should be selected according to:

    • the player,
    • the type of training,
    • physical limitations,
    • and the demands of the sport.

    Basketball requires repeated acceleration, stopping, jumping, landing and changing direction.

    Good movement preparation should therefore help players feel ready to perform these actions efficiently.

    Do Not Leave Recovery Until Tomorrow

    The end of practice matters too.

    Do not immediately rush out of the gym the moment training finishes.

    A short cool-down can create a useful transition between hard exercise and recovery.

    This may include:

    • light movement,
    • mobility work,
    • appropriate stretching,
    • hydration,
    • and beginning the recovery process.

    The purpose is simple:

    help the body move from training back toward recovery.

    Staying Available Is Part of Performance

    Players often focus on becoming:

    • faster,
    • stronger,
    • more skilled,
    • or more explosive.

    But there is another important ability:

    availability.

    A player cannot improve, compete or help the team while constantly missing training and games.

    For that reason, good preparation habits should become part of everyday basketball life.

    Warm up properly.

    Train seriously.

    Recover properly.

    Take care of your body.

    Because ultimately, only the player who can get onto the court — and stay on the court — has the opportunity to improve and compete.

  • Basketball Players Need Strength Training Too

    Basketball Players Need Strength Training Too

    Try it — and let us know what results you achieve.

    Strength Training for Basketball Players

    We strongly believe that basketball players need strength training.

    Work in the weight room can have a direct impact on performance on the basketball court.

    As players become stronger, they may be better prepared to:

    • attack the basket aggressively,
    • compete for rebounds,
    • absorb physical contact,
    • and defend with greater physicality.

    The purpose of this basketball-specific strength program is to help players become stronger while maintaining mobility and flexibility.

    The program was designed as a demanding, full-body training routine.

    The work done in the weight room should ultimately have one purpose:

    to help the player perform better on the basketball court.

    Basic Principles of Weight Training

    1. Train two or three times per week, preferably on non-consecutive days.
    2. Perform every repetition with correct technique.
    3. Once correct technique has been learned, progressively use greater resistance as appropriate.
    4. Rest approximately one minute between sets.
    5. Try to increase the resistance progressively as training experience develops.
    6. Keep a training diary so that progress can be monitored and the work remains structured.

    Three-Day Full-Body Program

    A possible weekly schedule is:

    Monday – Wednesday – Friday

    or:

    Tuesday – Thursday – Saturday

    The original program contains two different exercise routines. These can be alternated within the weekly schedule.

    Workout A

    1. Abdominal Exercises

    Examples:

    • oblique sit-ups,
    • hanging leg raises.

    The objective is to strengthen the trunk and provide a stable base for basketball movement.

    2. Bench Press

    10 – 8 – 6 – 4 repetitions

    Use controlled technique throughout the movement.

    3. Lat Pulldown

    3 × 10

    Develop the muscles of the upper back.

    4. Biceps Exercise

    3 × 10

    5. Triceps Cable Pushdown

    3 sets to the prescribed limit in the original program

    6. Squat / Leg Press

    12 – 10 – 8 – 6 repetitions

    Lower-body strength is particularly important for:

    • jumping,
    • rebounding,
    • acceleration,
    • defensive movement,
    • and playing through contact.

    7. Supported Leg Raises

    10 – 8 – 6 repetitions

    8. Calf Raises

    3 × 30

    9. Wrist Curls

    3 × 25

    Grip and forearm strength can also contribute to stronger ball control and physical play.

    Workout B

    1. Abdominal Exercises

    Examples:

    • sit-up with leg raise,
    • side sit-up,
    • abdominal crunch.

    2. Decline Bench Press

    10 – 8 – 6 repetitions

    3. Seated Row

    3 × 10

    4. Lateral Raises

    10 – 8 – 6 repetitions

    5. Dips

    3 × 10

    6. Dumbbell Biceps Exercise

    3 × 10

    7. Squat / Leg Press

    12 – 10 – 8 – 6 repetitions

    8. Behind-the-Neck Pulldown

    10 – 8 – 6 repetitions

    This exercise appears in the original program and reflects the training practices of the period.

    9. Calf Raises

    3 × 30

    Strength Should Serve Basketball

    Strength training should not be separated from the demands of the sport.

    The objective is not simply to become bigger or to lift heavier weights.

    For a basketball player, strength should support actions such as:

    • finishing through contact,
    • holding defensive position,
    • boxing out,
    • rebounding,
    • accelerating,
    • changing direction,
    • and competing physically throughout the game.

    The strongest player in the weight room is not automatically the best basketball player.

    The real value of strength appears when it can be transferred to the court.

    Technique Comes First

    One principle from the program remains especially important:

    Every repetition should be performed with correct technique.

    Increasing resistance has value only when the movement can still be executed properly.

    Progress should therefore be gradual.

    Training should be recorded.

    Performance should be evaluated.

    And the work should always remain connected to the athlete’s basketball development.

    Strength is not the goal by itself.

    Better basketball performance is the goal.